Amaoe AU3 BGA Stencil-Original
High-Quality Stencil for Chip Repair
Unlock precision and efficiency with the Amaoe AU3 BGA Stencil-Original. Designed for professionals and hobbyists alike, this stencil ensures accurate alignment and placement during chip repair tasks. Crafted from high-grade materials, it guarantees exceptional durability and consistent performance for all your reballing needs. Amaoe AU3 BGA Stencil-Original
Reliable Design for Advanced Repairs
The Amaoe AU3 BGA Stencil offers unmatched reliability, making it the ideal choice for advanced BGA chip repair. Its carefully engineered layout allows smooth solder flow, reducing errors and ensuring seamless functionality. Whether you’re working on smartphones, tablets, or other electronic devices, this stencil streamlines your repair workflow effectively. Amaoe AU3 BGA Stencil-Original
Perfect Choice for Hobbyists and Professionals
Whether you’re an experienced technician or a DIY enthusiast, the Amaoe AU3 BGA Stencil provides the versatility necessary to complete your tasks effortlessly. Its original design prioritizes ease of use, enabling anyone to achieve professional-grade results without compromise.
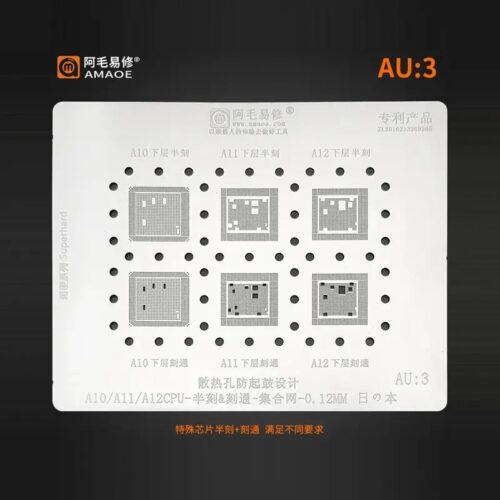
The Amaoe AU3 BGA Stencil is a professional-grade reballing tool specifically engineered for high-precision repairs on Apple iPhone motherboards. As part of the “AU” (Apple Universal/Unit) series, the AU3 model focuses on the A-series processors and their associated RAM/logic components. Amaoe AU3 BGA Stencil-Original
Below are the detailed specifications and technical parameters for the original Amaoe AU3 stencil. Amaoe AU3 BGA Stencil-Original
1. General Product Overview
| Parameter | Details |
| Brand | Amaoe (Original) |
| Series | AU Series (Apple Dedicated) |
| Model Number | AU3 |
| Primary Application | BGA Reballing / Tin Planting |
| Device Compatibility | iPhone A10, A11, A12 Bionic CPUs |
| Manufacturing Process | High-precision Laser Cutting |
2. Technical Specifications
| Specification | Value / Description |
| Material | Premium-grade 304 Stainless Steel |
| Thickness | $0.12\text{ mm}$ (Standard precision thickness) |
| Aperture Design | Square-round holes (Anti-sticking design) |
| Hardness | High-tensile strength to prevent warping |
| Thermal Resistance | Up to $500^\circ\text{C}$ (Maintains structural integrity) |
| Tolerance | $\pm 0.01\text{ mm}$ |
| Weight | Approx. $10\text{g} – 20\text{g}$ |
3. Compatibility & Chip Support
The AU3 stencil is highly specialized for the mid-to-late 2010s era of iPhone hardware. It provides precise alignment for both the CPU (Lower layer) and the RAM (Upper layer) in PoP (Package-on-Package) configurations. Amaoe AU3 BGA Stencil-Original
| Component Category | Supported Models / Chips |
| Apple CPU Models | A10 Fusion, A11 Bionic, A12 Bionic |
| iPhone Generations | iPhone 7, 7 Plus, 8, 8 Plus, X, XR, XS, XS Max |
| Associated ICs | CPU Logic, Upper RAM (LPDDR4), Power Management (certain variants) |
| Package Types | BGA (Ball Grid Array) |
4. Key Features & Advantages
-
Square-Round Hole Technology: Unlike traditional round holes, Amaoe uses a square-round aperture that prevents solder paste from sticking inside the holes, ensuring uniform solder ball height.
-
Heat Resistance: The original Amaoe stencils are treated to resist deformation under high-heat cycles from SMD rework stations.
-
Alignment Accuracy: Laser-etched markings and precision-cut pins allow for near-instant alignment with the chip’s pads, reducing the risk of solder bridging. Amaoe AU3 BGA Stencil-Original
-
Durability: The anti-rust metallic coating ensures the stencil can be reused hundreds of times if cleaned correctly after each use. Amaoe AU3 BGA Stencil-Original
5. Usage Guidelines
Pro Tip: For the best results with the AU3 stencil, use a medium-temperature solder paste (e.g., $183^\circ\text{C}$) and apply it using a flexible spatula. Ensure the chip is thoroughly cleaned of old solder before positioning the stencil.
-
Preparation: Clean the BGA chip using a desoldering wick and flux.
-
Positioning: Place the AU3 stencil over the chip, aligning the laser-cut holes with the chip pads.
-
Application: Spread a thin layer of solder paste evenly across the stencil.
-
Heating: Use a hot air station set to the recommended temperature for your specific solder paste.
-
Release: Wait for the solder to solidify (approx. 5–10 seconds) before gently lifting the stencil.

More Products : https://gaffarmarketdelhi.com